Set Up Raspberry OS and Install Pi-Hole
Install Software Locally
- SD Card Formatter
- Install using Homebrew:
brew install --cask sdformatter
- Install using Homebrew:
- Raspberry Pi Imager
- Install using Homebrew:
brew install --cask raspberry-pi-imager
- Install using Homebrew:
Format the SD Card
This process erases everything on the SD card.
- Insert a microSD card, then Open SD Card Formatter and choose the card from the Select card dropdown.
- Click Format to format the card.
- The default settings are fine: Quick format and no volume label.
Create the Pi OS Image on the SD Card
Raspberry Pi Imager makes the SD card a bootable drive.
- Open Raspberry Pi Imager
- Choose Device: Raspberry Pi 4
- Choose OS: Raspberry Pi OS (64-bit)
- Choose Storage to select the SD card
- Next
In the Use OS customisation? popup that appears, click EDIT SETTINGS. If the device you're using is connected to Wi-Fi, a prompt will show, asking if you'd like to use the Wi-Fi password from the system pre-filled in the Customisation screen. If you don't pre-fill it, you can still enter it on the next screen.
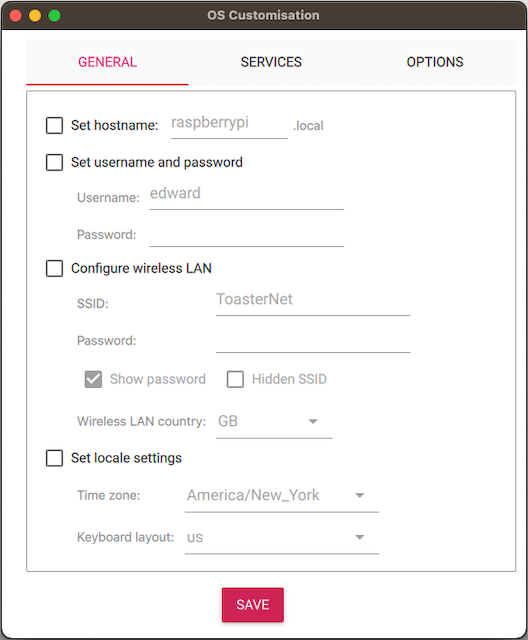
Make your selections in the GENERAL tab. Use your own easy-to-remember username and password:
- ☑ Set hostname:
pi-hole.local - ☑ Set username and password
- ☑ Username:
probablyedward - ☑ Password:
probablyhunter2
- ☑ Username:
- ☑ Configure wireless LAN
- Only if it's not going to be plugged in via Ethernet.
- Set locale settings
In the SERVICES tab:
- ☑ Enable SSH and ☑ Use password authentication Save
In the OPTIONS tab:
- Uncheck Enable telemetry
Plug it in and give it a minute to load.
Find the Pi's IP Address
If you configured Wi-Fi and plugged the Pi in via Ethernet, your Pi will have two IP addresses. To make it easier to enable network-wide blocking later, identify the Pi's Ethernet IP address.
For me, I use a TP-Link Omada controller:
- Log in and click the site's name.
- Click Clients then Wired to filter the table of connected clients.
- Click pi-hole in the USERNAME column to open the Details sidebar.
- Click Config and check ☑ Use Fixed IP Address.
Install Pi-hole
If you skipped to this section, expand this for things to look out for.
If you installed Pi-hole on an existing device or skipped to this section
OS-specific things that might be different for your setup:
- Installed software like Git, curl, or zsh
aptpackage manager. Your OS might use a different one.- User accounts. The examples I use are
probablyedwardandpi
Replace the username, probablyedward, and example IP, 192.0.2.25, in these steps with your Pi's username and local IP.
-
Open your terminal app and SSH to the Pi:
Enter the password when prompted.
-
Update the system and install dependencies:
sudo apt update && sudo apt upgrade -y
sudo apt install git php-cli php-sqlite3 php-intl php-curl unbound
Enter the password when prompted. This is the point at which I also configure my command line interface (CLI) and editor, but that's outside the scope of this doc.
-
Run the Pi-hole installation script:
curl -sSL https://install.pi-hole.net | bash -
The script will prompt you with a number of warnings and options. When prompted select:
- Choose An Interface:
eth0for Ethernet. - Static IP Address:
Yesand enter the IP address you found in Find the Pi's IP Address.- Unless you've made specific changes to the network, the gateway address should be the IP of the router or controller. In this example, that's
192.0.2.1.
- Unless you've made specific changes to the network, the gateway address should be the IP of the router or controller. In this example, that's
- Upstream DNS Provider: Select
Cloudflarefor now. This is a setting we'll change later, but we select Cloudflare's DNS server now so that every DNS request from the Pi going forward will be routed through a trusted directory. - Blocklists:
Yesto use the default list. - Admin Web Interface:
Yesto install the Pi-hole web interface.- Web Server:
Yesto install lightppd for the web interface.
- Web Server:
- Enable Logging:
Yesto enable query logging. This helps diagnose issues like when Hulu or Disney+ won't load on your smart TV.- Select a privacy mode:
0to show what site got blocked on which device. Consult the official Pi-hole docs for more information about the privacy levels.
- Select a privacy mode:
The last screen lists the IP and a temporary password for the Pi-hole web interface. Since we'll change it in the next step, it's safe to ignore this.
- Choose An Interface:
-
Change the temporary password. Change the
examplePasswordin this example:pihole -a -p examplePassword -
Optional: Follow the steps in the official Pi-hole documentation to configure unbound.
This step is optional because the Pi-hole is already configured to use Cloudflare's DNS provider. Use unbound if you prefer a recursive DNS server.
-
Log in to the Pi-hole web interface: http://pi.hole/admin